Safety
You can disable the possibility of the crew's death via the main configuration screen.
If you like realism and choose to enable environmental effects on the crew, here are the main dangers your crew will face:
1- G effect
2- Impact with ground
3- Incorrect life support settings (oxygen, CO2, etc.)
G effects in the Delta Glider II
The effect of too many G's on the body in real life mainly depends on
three parameters:
1. G vector (negative G, positive G)
2. G force
3. G duration
The DeltaGlider II only models the second and third parameters. They are
accurately modeled (as well as I could) to represent real effects from
G forces. High G forces will damage your crew's health and can even cause
death; similarly, G forces that are sustained for short periods of time
will not be as harmful (relatively) as the same forces sustained for longer
periods of time.
As blood drains into the lower parts of the body, it leaves the brain
without oxygen. This can lead to "G-LOC" (G-induced Loss Of
Consiousness), or even death if the brain is deprived of oxygen long enough.
Scientific tests have showed that people experience health effects from
G forces differently. Physical conditioning and age are factors that can
help determine a person's ability to withstand G forces. A person in good
physical condition, with sufficient training, can sustain 3G-5G more than
an untrained person.
In the DeltaGlider this disparity is simulated by the status and age of
the crew, as specified by you in the configuration screen. For any given
age, the Pilot will be able to sustain about 3G more than the passengers
in the DeltaGlider II because of his training. In addition, since very
old or very young people have less ability to withstand the effects of
G force stress, the age you select for your pilot will determine his relative
ability to resist G stress.
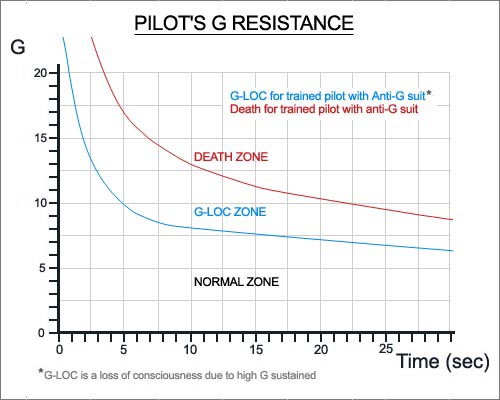
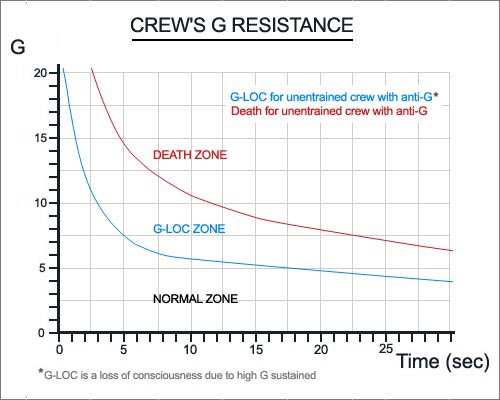
You can see below how the pilot and passengers react to G effects in the
DeltaGlider II (all crew and passengers on the DG2 are wearing anti-G
suits to help manage G stress effects). The data was collected from real-life
information; however, keep in mind that these graphs are represent averages.
In real life, some people can experience G-LOC at only 2G, while others
only succumb to G-LOC at significantly higher G stresses than most normal
people can withstand.
Impact of G forces on your crew
As you sustain more and more G's, you will first see the passengers experience
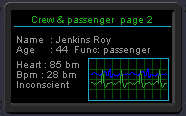
G-LOC. After this, if nothing is done to reduce G's, they will die (you
can monitor the health of the crew in the Life Support MFD section of
the lower panel--press the "CRW" button). The pilot will experience
G-LOC shortly afterwards.
If the pilot (you) falls into G-LOC, all other sounds will cut out and
you will hear a heartbeat sound. If the "loss of control" option
is enabled in the configuration, the spacecraft will tumble out of control;
you won't be able to press most keys or click on panel buttons. However,
you WILL still have control of the RCS so that you can correct your flight
attitude to reduce the G's (think of it as if there were an "automatic
pilot" that kicks in if the pilot experiences G-LOC).
The crew will recover from G-LOC after a bit of time with reduced G's.
The amount of delay until full recovery is achieved depends on the severity
of the G force they sustained and the time they sustained it; the recovery
delay can be as long as a minute.
 |
 |
If no action is taken under high G conditions, and the pilot dies, you
will completely lose control of the vessel (unless you specified otherwise
in the initial configuration).
How to avoid G forces in Orbiter
Your trajectory is the main thing that can generate G forces; specifically,
the most dangerous situations are reentry or aerobraking in an atmosphere.
If your re-entry trajectory is at the wrong angle, you may find G forces
build to an unacceptable level for your passengers and crew. Even if you
re-enter at the correct re-entry angle, you must also make sure that the
vessel's pitch (angle of attack) stays within the correct range for a
successful re-entry.
For a correct reentry you should place your perigee so that it's just
inside the high atmosphere. The higher your speed, the higher your perigee
should be so that you have more time to "bleed off" speed in
the high atmostphere.
When it's time to deorbit, you have a very useful display in the flight
computer to guide you in your descent. Press "D", then "2", and the de-orbit
MFD display will show your predicted re-entry angle, range to ground,
and speed. There is a tutorial in this doc that demonstrates a complete
re-entry from the ISS using the autopilot and the correct instruments:
Click here for the tutorial.
Impact with ground
If the DeltaGlider 2 hits the ground with a vertical impact speed of more than approximately 20 m/s (72 km/h) the crew will die. Even at lesser impact speeds, the crew can lose consciousness; so make sure to land as gently as possible!
Incorrect life support settings (O2, CO2, etc.)
The crew cabin must contain the correct breathable proportions of oxygen and carbon dioxide. If you set the cabin levels of each gas incorrectly, the crew may die. Read more info about the life support system here.